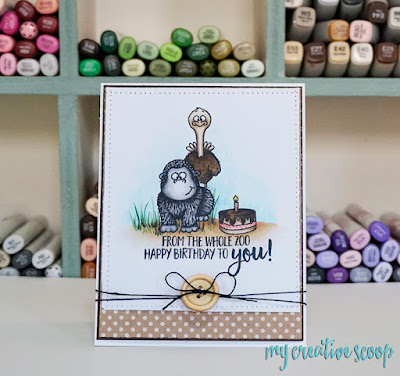
Party Animals Copic Marker Tutorial

March 22, 2017


Hello! This is Mindy from My Creative Scoop! I'm so excited to be joining Gerda Steiner Designs in this guest post!

 I'm using the new stamp set, Animal Party and we are going to mask a scene, then create different animal textures with our Copic Markers. I always use patterned paper scraps to do this, then I cut him out, with some fussy cutting. Then, lay the patterned paper chimp over your actual image you're going to color. Now, you're going to ink up the stamp you want behind, I'm using the ostrich, and stamp him where you want. Just like in this first photo.


Now, color your image using N0, N1, N3 and N5. You don't have to make it too detailed since we will do that when we add the texture, but you do want to add some shadows. You'll make shadows with the N5 then blending out with the next color and so on, the darkest areas will be just behind the shoulder on the back and side, the outer part of the sides of the face, under the neck, under the chest and on the inner parts of the arms. 


Then use N9 to make tiny flicks and dots all over the gorilla, creating the hair like texture. Notice how I've even made the flicks come out of the outline just a little.


Now, with the N5 we are going to shadow those shadowed areas again, making them stand out a little more.


Then go back and add more N9.


Time to add a different type of texture to the ostrich. We want more of a fluffy, feathery look. So using E41, E42 and E43 color the neck and when you get to the body, add spots until the body is fully covered. Start with a little bit of the E42, and then E43 and then fully cover with E41. 


We still want to define shadow areas so behind the neck and under the wing and some spots using E49 and E45.


Then go over the entire body again with E43, blending all the colors in a little. When doing this you still want to 'dot'. 


Then add little finishing touches to your scene and you're all done!


I hope you have enjoyed my tutorial and card. Have a wonderful day!


Leave a comment


Also in Gerda Steiner Designs

Have a berry sweet day by Noga Shefer

February 17, 2023

 Hi crafty friends,  Noga  here and I am so happy to share with you a project for Gerda Steiner Designs today.


My card featuring the  adorable Strawberry Mouse - GSD795
 
To make this card I took an A2 panel of plaid cardstock and panel of Bristol smooth cardstock.

I sponged lumberjack plaid distress oxide ink on the Bristol smooth and  die cut a scalloped edge.

Next I colored the sweet image using...

Continue Reading

Penguin Birthday Shaker Card

December 28, 2022

Hello everyone, it's Karen here today and I hope you had a good Christmas holiday! I've got a shaker birthday card for you today with some happy, little penguins.

I've used the Penguin Cake - 4x6 Clear Stamp - GSD799, to create the cake and penguins. I masked the two front penguins after stamping them on some Neenah Solar Crest card, and then stamped the cake and the middle penguin afterwards. I...

Continue Reading

Get well soon by Noga Shefer

December 22, 2022

 Hi crafty friends, Noga  here and I am so happy to share with you another project for Gerda Steiner Designs today.


My card featuring the adorable Positivi-Tea 4x6 Clear Stamp Set stamp set.
This is perfect for "get well soon" cards.

To make this card I took an A2 panel of Bristol smooth cardstock and cut it with circle die.
For the background, I die cut the scallop frame die out of white cardstock....

Continue Reading